The Ford F-150 is a famous truck with a rich history. It is tough and sturdy, powerful and indispensable for many applications. Moreover, its capability can be increased for specific aims. Unlike a car, this pickup truck can handle off-road trips, but lifting its ride height will give it extra clearance for more serious tasks.
Hereunder it’s described how to install Pro Comp’s 6-inch lift kit (covered by a comprehensive warranty) on the Ford F-150 AWD, and the detailed guidelines of this process can be found here: Six key learnings from our ford f-150 lift kit install.
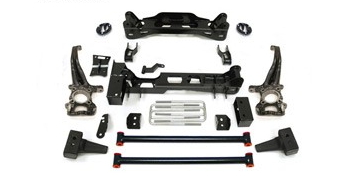
Pro Comp 6 Inch Lift Kit for Ford F-150
- You will need a hoist or a jack to lift the body, and another jack to support the differential. Elevate the body and take off the front wheels.
- Choose any side of the front suspension, and take off the caliper, braking backing plate, then disconnect the ABS sensor.
- Remove the axle nut, tie-rod end, sway bar end, unbolt 3 bolts holding the vacuum actuator to the knuckle, and remove the brake disk and the knuckle. Then unscrew the lower ball joint nut, the upper ball joint, and the lower and upper strut bolts to remove the strut and the lower control arm.
- Do the same with another side, then remove the sway bar.
- Mark the relative position of the drive shaft, and disconnect it from the front differential. Then, remove the front crossmember. To remove the front differential, unbolt its 3 bolts. It’s a heavy part, so support it with a jack, and ask somebody to help you take it off.
- Measure 2 and 11/16 from the top of the cam bolt hole of the driver side control arm pocket, draw a horizontal line, and cut off along this line.
- Install the front differential, as well as the new front and rear crossmembers from the kit, and the brace for the rear crossmember. There will be some drilling, use the brace as a template. The lower front skid plate must be installed afterwards. Reinstall the drive shaft using a spacer. Then go ahead and install a front factory sway bar.
- Install the factory wheel bearings into the new Pro Comps knuckles, and the spacers from the kit on the factory struts with the springs. Now everything should be installed back on the vehicle, as well as the cross-bar from the kit.
- On the truck’s rear part, take off the wheels, install the lift blocks from the kit, new shocks, brackets, and spacers (spacers are needed only if the rear part must be slightly higher than front one).
- Install the wheels, and check the torque of the suspension joints, when the truck is already standing on the ground.
Following this instruction step by step and having some tools, you will cope with this installation. See video by CARiD!
Add Comment